Battle Guide
By Arikrat · April 2019 · EssentialsBack to guides
So, you are new to Stormbound and would like to progress quickly. You came to the right place. In this guide, we will focus on battle mechanics and how to play smart on the battlefield. For a more beginner-friendly guide, check the rulebook.
Introduction
First, this guide is based on my experience playing the game since the release. I am far from being the best player in the game, but I think I have a good grip on the game mechanics and I hope to help dedicated players as well as new ones to get better at this awesome game.
For a lot of you most of the things in this guide won’t be new. I also play with level 4-5 cards, so a lot of my analysis of cards is based on my experience playing them at such level. Also I play mostly in Diamond, so my knowledge of lower league is either from my discussion with other players and from analysis (and not from first hand experience).
Game mechanics
Attack pattern
When your turn begins your units attack from left to right and from front to back. It is quite important to know if you want to place your units in the best possible way. What is most important about this is to understand how the enemy units will attack next: they will attack from (your) right to (your) left and (your) back (near your base) to your front (near the enemy base).
When a unit being played can attack two different targets, it will choose it in this order: front, then middle columns, finally side columns (sometimes said forwards-inwards-outwards, or FIO). Knowing this, you can now plan your attack by putting bait unit on the best spots.
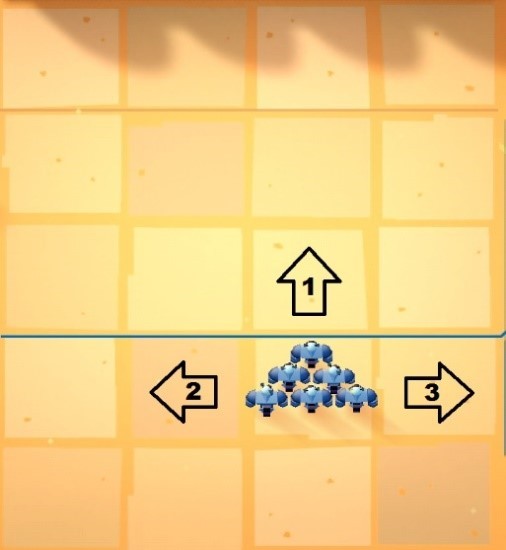
A classic attack often looks like this. The numbers indicate the order of the units your opponent will have to kill to get to the next one. As you can see, the sides are harder to defend against than the middle. I like to call the Unit 1 and 2 “Baits”.
Baits do not need to have a high strength: their purpose is just to make the opponent use cards to kill them. Units 3 are the main Attack and should be your stronger units. Think about that before playing something like Potion of Growth.
 3mana3mana
To be able to make a good push, your biggest units are to be on the sides.
Discard and draw mechanics
When playing or discarding a card, this card will be shuffled back in your deck with a higher probability to be put at the bottom of it. Because of this, you can sort of “manipulate” your future draws.
For example, you want to play the Frosthexers/Midwinter Chaos combo but are short on mana: what you can do is discard Midwinter Chaos just before playing Frosthexers. This way the probability of drawing the two cards back to back in the next turns is higher. You will not have to keep the combo in your hand, hoping not to separate the cards. The probability of drawing a card you just discarded or played exists but is very low.
You can learn more about the hand manipulation mechanics such as drawing, discarding and cycling in the drawing rules.
What and when to discard
In Stormbound, your deck is made of 12 cards. Of those 12, at least 3 should be over 5 mana (except for ultra aggro decks). Furthermore, in those 12 you should have 1 to 2 situational cards (combo pieces or control cards). Taking this in consideration, you realize that cycling your deck as often as possible is the best way to optimize your play.
As we will see, you want to use all your mana each turn. For that, you need to find your low-cost cards to fill the gap left by your expensive cards. That is why you need to discard each and every turn.
The cases when you will not discard are situational: you already have the win condition in your hand and will play it next turn, you have a good combo or a great card in your hand that you’ll play next turn, or you think your hand is the best possible one in your situation and you’ll play the 4 cards this turn.
Those cases aside, you will have to discard a card. The first question is which card to choose. The easiest choice is the card you will not be able to play this turn or the next. For example, I tend to keep a 5 mana card on my 4 mana turn, just to be sure to max out my mana usage for the next turn. If you can play all the cards in your hand, you need to discard the least cost-effective card of course. All of this is obvious.
The trick is when to discard the card. You will discard before playing almost all the time. The reason is for you to have all the information to play the best turn possible.
I list 4 cards that make you discard during your turn or at the end of it: First Mutineer, Freebooters, Goldgrubbers and Collector Mirz. For Collector Mirz, you will want to discard after playing it to get the new free unit as fast as possible. For First Mutineer, I tend to discard after playing it if necessary. It is also possible to discard a card before playing First Mutineer just to cycle faster your deck (First Mutineer is an amazing card for that). Finally, Goldgrubbers and Freebooters are obvious ones: you want to have all the information before making your choice.
Game strategies
The Golden Rule
“They who spends their mana shall win the game.”
The most important thing of all is to use all your mana each turn. You need to be able to play as many cards as possible AND not let a single mana unused at the end of each turn. Thus, you need to include at least two 3-mana cards and/or 1-mana cards in your deck to do something on your first turns and to fill the latter turns.
Basic Strategies
As I see it, there are 4 types of decks in this game: Go Big (or Heavy), Go Wide (or Zoo), Aggro and Control. And 3 types of games: fast, medium and long. A fast game ends with 6–7 mana, a medium with 7–9 mana, a long with >9 mana.
A Go Wide deck will play a swarm of units to take over the board. 3 factions can do that: Swarm, Shadowfen and Dragons (for all intents and purposes I consider Dragon a faction). The goal of this strategy is to play so many units your opponent will not be able to kill them all before your next turn. Then you reinforce them with spells or units before winning with cards like Herald’s Hymn or Obsidian Butchers.
To do so you will need to play lots of cheap cards, and cards that create multiple units. Swarm will try to play as many Satyrs as possible and take advantage of cards like Pan Heralds and Swarmcallers. Shadowfen will not win with the sheer force of their 1 strength toads but with the board control they give with cards like Toxic Sacrifice and the awesome “bait ability” of these little units. It is harder to kill a big Witches of the Wild when toads are everywhere. Swarm tend to be faster than Shadowfen making Kindred’s Grace a better card for Shadowfen.
A Go Big deck will try to play big units to advance steadily the front line. This type of deck will not use many 2-speed cards but will try to win trades to begin its turn with at least 1 or 2 big units already on the field. To achieve that the player has different options: boost their units with spells like Potion of Growth or Personal Servers or play big units like Veterans of War or Cabin Girls.
With this kind of deck, the goal will not be to wipe your opponent’s units as they play them but to have bigger ones. The ultimate goal is to put a big enough unit in front of the enemy base and protect it by using bait (as explained in the Attack Pattern part). The best Go big factions right now are Dragons, Ironclad and Pirates (also considered a faction).
Go Wide and Go Big decks are “tempo deck” and will try to win the medium matches. They are quite strong in the meta right now.
The best Aggro decks are Swarm and Ironclad decks. The purpose of these decks is to play fast units and/or lots of cheap units to advance your line and either fill the lane in front of the enemy base (called a “baselock”) or attack with 2-speed units. Blocking the advance of your enemy is less important in this kind of strategy. To accomplish that you need a very low mana curve, playing 2- or 3-mana units only and one costly card at most (sometimes Herald’s Hymn for Swarm). This kind of deck is interesting to try to climb the ladder faster but suffer from a quasi non-existent winning chance in longer games.
Finally, the Control decks. These decks sole purpose is to block the development of the enemy before crushing them with high value cards like Olf the Hammer, Visions of the Grove or with chip damage like Needle Blast. With this strategy, you won’t try to push big units but kill all your opponent’s units instead, knowing that you will have the advantage in the long run. The most important thing is not your front line advance but the control of your enemy’s board presence.
Board wipe cards (Bladestorm, Victors of the Melee, Crimson Sentry, Toxic Sacrifice…) or combo (Midwinter Chaos + Frosthexers + Wisp Cloud) are the bread and butter of control decks. These decks win the long matches (obviously). They are good decks but take a long time to play, making them mediocre to grind gold or victory quests. They excel at pushing in higher ranks though.
All these archetypes have their technicalities and tricks to play and master. I will explore some of them in later sections.
Managing the board
I call line, or front line, the foremost row where you can play your cards. It is the most important thing to consider before beginning your turn: where is your line and how can you push it effectively.
By mastering the attack pattern of units, you can predict how your units will interact with the opponent’s ones. Spawning cards like Shady Ghoul, Doppelbocks and Azure Hatcher are good cards to advance further your line without being “distracted” by bait units.
Being able to keep your line closest to the enemy base is the essence of this game strategy, allowing you to have a wider diversity of play available. Depending on your game strategy, the line will have a different priority in your list of things to do in the turn. A Go Big deck will prefer playing a unit to keep its line further, rather than using it to kill another enemy unit most of the time.
The real question you have to ask yourself before playing a unit is, “do I prefer Board Presence or Board Control?”
Board Presence is having units on the board, Board Control is not having enemy units on the board. Control decks will need to prioritize Board Control where aggro decks will prioritize Board Presence. Medium decks will have to do both if they want to be effective. Good cards for that are Witches of the Wild, Amberhides, Victors of the Melee, Blood Ministers, Rockworkers, Armed Schemers… That is why I think playing a medium deck is hard. You have to make more decision like this. What you can do to help you chose is to know what your opponent is playing.
If your opponent is playing Control, do not do their job for them: prioritize Board Presence. On the opposite, if the opponent is playing Board Presence, prefer Board Control.
If you have a good way to clear the board (like Toxic Sacrifice, or a freeze combo) do not be afraid to let your opponent gain board presence, concentrate on maintaining yours to be able to play your cards where it is the most effective.
When to attack the base
You will often be in a situation where you can either attack the base with a 2-speed unit or play something else. You will have to think about “Board Presence” and the “Base Life Points Threshold” (BLPT). I call BLPT the number of life points you can directly remove with a single card in you deck. For example having a level 5 First Mutineer in the deck makes the BLPT 5. If I also have a Level 5 Needle Blast the BLPT will be 4 and 5. Always try to consider the lowest BLPT.
It is important to realize that when you do a direct attack on the base with a 2-speed unit you also lose Board Presence. If by doing so I do not put the base on BLPT, I always prefer Board Presence to it. I consider the only time you can directly attack the base without putting it on the BLPT is when you already have a better Board Presence than your opponent (i.e. when you have at least 2 more units on the board with strength equivalent to the ones in your opponent’s deck) or when you play a Super Aggro deck.
How, when and where to play structures
Structures do not move, are not affected by poison, freezing or push/pull effects. They often have a start of turn effect. The key weakness of a structure is the fact that it does not do anything the turn you play it, leading to a loss of tempo: you play something that needs to survive a full turn to be useful and that will not advance your line next turn.
If left unchecked for a few turns the structures build much advantage and often win you the game. It’s a high risk/high reward thing. One of the paradox of structures is that you need to play them early to give them a chance to survive but the tempo loss can also lead to your quick defeat…
The next question is: “where to play structures?”Never ever play a structure on the middle columns next to your base. In addition, always take advantage of an enemy structure on these positions:
3mana3manaIf the enemy placed a structure on 1, they will not be able to attack your unit on 2: it gives you board presence and direct damage to the base! Note that it’s the biggest risk of playing Rockworkers. Always think about that before playing it. You don’t want to end with a Fort of Ebonrock on the 2 middle tiles.
For more information about playing and countering structures, please refer to the Structures Guide which goes into more details.
When to push your advantage
Sometimes your deck is much stronger than your opponent’s. In these cases, prefer Board Presence to Board Control and maintain a constant stream of units to beat them quickly. You can do this if your cards are ~2 levels higher. These kinds of games are not hard to win and I think this advice will not be that useful.
If your cards are not that much stronger, always be cautious of not letting your opponent fill your first row.
Choosing your faction
You have to consider two things before choosing a faction to play: in which faction are your highest-level cards? What kind of deck do you want to play?
In this game, card level is probably one of the most important thing. A crappy deck with level 5 cards will usually win against a good deck with level 3 cards. The power difference after level 4 is too important (before level 4 you can play whatever you want, level 2 and 3 being quite similar). Each faction has its advantages and disadvantages.
Swarm
- + Aggro and Go wide decks.
- + Excellent Satyrs synergies.
- + Restless Goats and Shady Ghoul are amongst the best 2-speed units.
- + Possibility to play chip damage strategy.
- + Forgotten Souls is the easiest way to win fast in the game.
- + Great at low level, good at high level.
- - Poor late game capability.
- - Worst control of the game.
- - Suffers in Platinum and Diamond leagues from the better end game strategies of the other factions.
Ironclad
- + Good/great Go Big ability.
- + Good defensive cards (such as Windmakers).
- + Good Constructs synergies (Linked Golems is insane).
- + Possibility to do chip damage (with Overchargers and Booming Professors).
- + Good at all levels of play.
- + Balanced faction.
- + Great against Go Fast strategy.
- - No exclusive game winning card.
- - Have a hard time against Go Wide strategies.
Winter
- + Best late game.
- + Best Control.
- + Excellent in Platinum/Diamond leagues.
- + Great against Go Wide and Go Big strategy.
- + Unstoppable after the 8-mana turn.
- + Best use of high mana turns.
- - Kills are mediocre at low level (Visions of the Grove, Gift of the Wise, Lady Rime).
- - Hard time against Go Fast.
- - Can lose pretty fast.
- - Longer games.
Shadowfen
- + Best common of the game: Witches of the Wild. That card gives both Board Control and Board Presence.
- + Great Control ability.
- + Excellent Go Wide ability.
- + Excellent against Swarm in all its forms.
- + 2 great synergies (Toads and Poison).
- - Lack an exclusive game winning card.
- - Lack a strong end game strategy.
Dragon
- + Great Go Big and Go Wide ability.
- + Best synergy of the game.
- + If not controlled fast they can snowball the game in 2 or 3 turns.
- - No common cards.
- - Need higher level cards to win against other factions.
- - Weak if they have no Board Presence => Weak to good control deck.
- - Can’t play them elsewhere than in a dragon deck (except Tegor the Vengeful, Draconic Roamers, Spellbinder Zhevana and Greengale Serpents).
Pirate
- + Lots of good common cards (First Mutineer, Bluesail Raiders, Westwind Sailors, Freebooters, Cabin Girls…) that can be used in all sort of decks.
- + Good Go Big strategy.
- - Weaker than other faction-specific strategies.
- - Only Go Big strategy.
- - Lots of random effects (Goldgrubbers, First Mutineer, Snake Eyes…).
- - Mediocre in high leagues.
Again, the most important thing IMHO is to get the biggest collection possible. Only upgrade the faction you want to play and buy splendid books with the rest of your gold.
Deck building
Mana Curve
Mana curve represents the distribution of mana in your deck. You’ll want early drops like 2- or 3-mana cards to be able to play on your first turns (see the part about using all your mana each turn). Once you have these low-cost cards (minimum 3 for control decks, up to 6 or 7 for aggro decks) you’ll need an even repartition between more expensive cards. To help you make a choice between 2 cards you can use the total mana cost of all your decks and use the following numbers as guide.
- Aggro deck: between 34 and 38 mana.
- Medium deck: between 36 and 42 mana.
- Control deck: above 42 mana.
For more information about building competitive decks, read the deck building guide. And to know more about the concept of mana curve, check the guide on mana curves.
Units
You should always select 1-speed units and at least one 2-speed unit. Do not play too many 0-speed units. They often are bigger and have better effects but the loss on your ability to push your line is not trivial.
Green Prototypes is commonly accepted as the best card in the game, for its strategic value. I play it in almost all my decks because of all the things it can do: push your line, trade for another unit, play as bait, fill your mana curve. I consider it a 0/1 in the worst case scenario for one mana (because it gives the opponent as much strength that it takes to kill it).
Ways of winning
In Stormbound, you win by putting the enemy base at zero. For that, you have three possibilities: start your turn with a unit on the enemy’s first row (the classic way), attack the enemy base with a 2-speed unit (the fast way) or doing direct damage to the base (the slow way). I always try to put at least two non-classic ways of winning in my deck, be it two 2-speed units or one 2-speed unit and one direct damage. Some decks can also play full direct damage (known as “chip”). Rare are the decks that can win consistently only by using the classic way.
Synergies
If you want to play with synergies (and you should) you will have to cycle your deck fast to play your cards consistently and you will need enough cards for you to do so.
Good examples are poison and freeze. For a poison deck to work you will need at least 2 poison enablers (Toxic Sacrifice, Copperskin Ranger, Venomfall Spire and Heliotroopers) and 1 or 2 cards that benefit from poisoned units (Amberhides, Marked as Prey, Brood Sages…). Do not play too many cards relying poisoned units because without any, they are just dead cards. For the same reason do not play all your poison enablers because they become redundant.
The freeze mechanic is exactly the same but with stronger independent cards, which allow you to play less freeze dependent cards.
Then you have the case of unit synergies (Pirates, Dragons, Satyrs, Constructs). These cards need to be in at least four or five per deck (which is a lot). The goal is to always have at least 2 in your hand when playing them to benefit from their synergies in the same turn.
Combos
Combos work exactly like synergies except it is usually 2 or 3 cards that you want to play back to back. For that, you will need to cycle carefully. What I do is I keep 1 card of the combo until I get the other one, then I play 1 and discard the other right before or after (if I can’t play both).
These are commons combo:
- Moment’s Peace and Midwinter Chaos.
- Archdruid Earyn and a big spell (such as Needle Blast, Call for Aid…).
- First Mutineer and Northsea Dog.
- Rain of Frogs and Kindred’s Grace or Prime Oracle Bragda.
- Potion of Growth and Herald’s Hymn.
- Finite Loopers and Linked Golems go well together because Finite Loopers makes sure that you can always take advantage of the Linked Golems ability.
Always try to find good combination of cards in your deck. Those are what make your turns more efficient.
How to evaluate a card
To compare cards I often do as follow: I look how much strength it brought to the board and add 2 for a 1-speed unit and 3 for a 2-speed unit, and then I compare it with same-cost cards. I also subtract the strength it gives to the enemy or take from my side. I try not to compare cards with different costs. For example, level 5 Gifted Recruits is 5+2 for 2 mana, Linked Golems at level 3 is 3(+6) +2 for 3 mana. This way, I can make rationalized choices for my deck. Of course, you also have to take into consideration all the previous point about synergies and coherence.
For a closer look at the estimated value of cards, be sure to play with the value calculator.
Contact me
I go to the subreddit (r/stormbound) daily and always try to respond to the people asking for some advice. I’m always open to discussion. I’m also active on the official Discord Server of the game. Feel free to contact me (u/Arikrat) or to add me ingame (ID 1001572357). Thank you for your time reading this.
Looking to teach others and guide them towards glorious battles?
Have your own guide published.